In the world of machining and engineering, precision and accuracy are paramount. When it comes to creating holes with specific characteristics, two common techniques are often employed: counterbore and spotface holes. While both serve similar purposes, they have distinct differences in their applications and functions. Let’s explore the characteristics of counterbore and spotface holes to understand their unique roles in manufacturing:
What Is A Counterbore Hole?
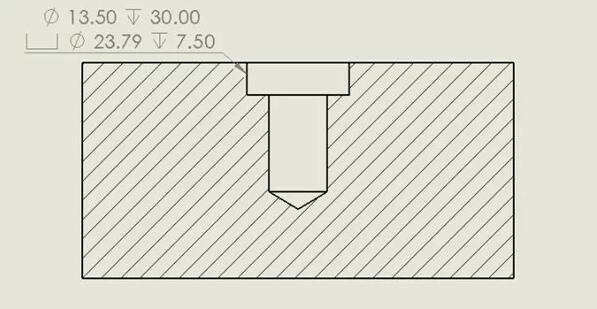
A counterbore hole is a cylindrical recess that is wider than the hole it surrounds. It is typically used to create a flat-bottomed opening at the top of a drilled hole. The purpose of a counterbore hole is to provide a seating surface for a fastener, such as a bolt or screw head, allowing it to sit flush with or below the surface of the workpiece. This helps distribute the load evenly and prevents the fastener from protruding above the surface.
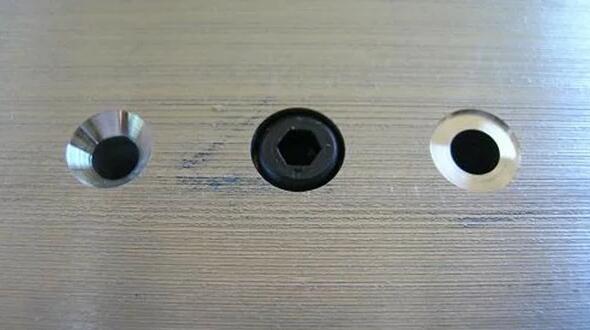
For example, look at the picture below. Screws are necessary for assembling power socket components. However, the screw head may hinder the plug from fully inserting into the socket. Therefore, a countersunk hole has been added to solve this problem.

Holemaking is a very diverse machining operation with several kinds of hole geometries. Owing to the variety of holes in engineering design, a counterbored hole is generally indicated on a drawing using a counterbore callout.

Key Characteristics of Counterbore Holes:
Flat-Bottomed: Counterbore holes have a flat bottom, which provides a stable surface for the fastener.
Increased Diameter: The diameter of the counterbore hole is larger than that of the drilled hole, allowing the fastener head to sit below the surface.
Uniform Depth: Counterbore holes are typically drilled to a uniform depth, ensuring consistent seating of fasteners.
Applications of Counterbore Holes:
Assembling machinery and equipment with bolted connections.
Creating recessed areas for decorative or functional purposes.
Improving the appearance of surfaces by concealing fasteners.
What Is A Spotface Hole?
A spotface hole, on the other hand, is a shallow recess or flat surface created around a hole to provide a precise and level seating surface for a fastener or bearing. Unlike counterbore holes, spotface holes do not have a larger diameter than the hole they surround. Instead, they are designed to clean up and flatten the surface around the hole, ensuring proper alignment and contact with mating components.
Some assemblies require fasteners to be at an angle to a flat surface, in which case a flat seat is necessary for fastener assembly. This flat seat is thus achieved with a spotface, as the figure below shows.

It is to be noted here that spotface should not be confused with countersinks. Countersinks are very similar to spotface holes but do not have a flat bottom, but rather an angled one to accommodate cone-shaped screw heads.
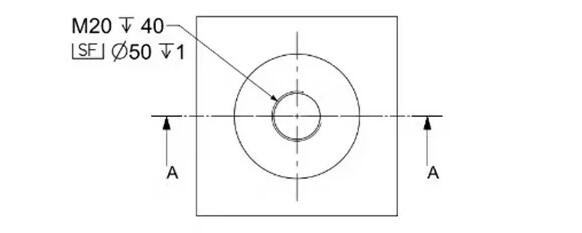
As with counterbores, spotface holes also have a unique symbol for engineering drawings. The spotface symbol is derived from the counterbore callout, with an ‘SF’ marking included inside the regular counterbore symbol. SF in this case is for Spot Face.
The image below shows a simple example of a spotface callout.

Key Characteristics of Spotface Holes:
Shallow Depth: Spotface holes are typically shallower than counterbore holes, with depths ranging from a few thousandths of an inch to a few millimeters.
Same Diameter: The diameter of the spotface hole matches that of the drilled hole, ensuring a snug fit for fasteners or bearings.
Smooth Surface: Spotface holes produce a smooth, flat surface around the hole, free of burrs or irregularities.
Applications of Spotface Holes:
Providing a level seating surface for bolt heads, nuts, or washers in mechanical assemblies.
Ensuring proper alignment and contact between mating components, such as bearings or seals.
Creating uniform surfaces for gasket sealing in fluid or gas systems.
In summary, while both counterbore and spotface holes are used to provide seating surfaces for fasteners or bearings, they differ in their design, depth, and applications. Understanding the distinctions between these two machining techniques is essential for achieving precise and reliable results in manufacturing and assembly processes.


