What is Tolerance?
Machining tolerance, also called dimensional accuracy, is the acceptable amount of variation in the size of a part. This is expressed as the maximum and minimum size limits of the part. If the size of the part is within these limits, the part is considered to be within the tolerance range. However, if the dimensions of the parts exceed these limits, the parts exceed acceptable tolerances and are considered unusable.
Regarding CNC machining, tolerances are used in two different contexts: in terms of CNC machine and in terms of CNC machining design.
In CNC machine, tolerance refers to the dimensional accuracy that the machine can achieve when machining parts. CNC machines are very accurate, and some machine can produce an accuracy of ±0.0025mm. However, the tolerances of different CNC machines are different and are usually specified by the manufacturer. For example, 0.02mm is a typical average tolerance. CNC machining suppliers can adjust the tolerance of the machine to meet the tolerance specified by the customer.
In design and manufacturing, tolerance is the acceptable range of dimensional changes of the part, which will still allow the full function of the part. The tolerance is determined by the designer and is based on the function,application and shape of the part.

Tolerance Types
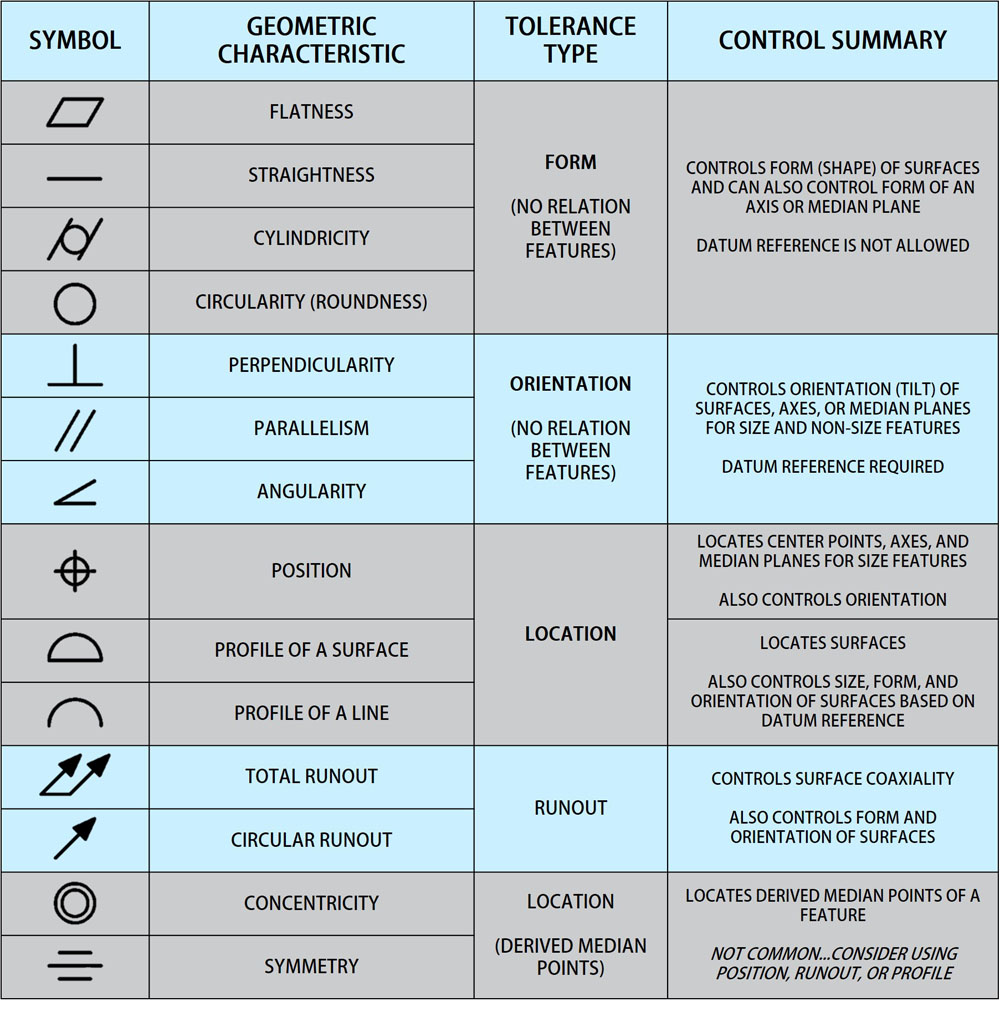
Geometric Tolerance
It not only provides the dimension and tolerance of a part but also specifies the exact geometric characteristic of the part the tolerance applies to, such as flatness, roundness, cylindricity, straightness, profile, etc. It is the tolerance of the geometric shape of the measured element, that is, the accuracy of the geometric shape. There is no error to the reference, and it is an independent error.
Dimensional Tolerance
Dimensional tolerance means that in the manufacturing process of parts, due to factors such as processing or measurement, there is always a certain error in the actual size after completion. In order to ensure the interchangeability of parts, the actual size of the parts must be controlled within the allowable variation range. This allowable dimensional variation is called the dimensional tolerance.
The upper limit specifies the maximum acceptable dimension while the lower limit specifies the minimum acceptable dimension . Any value in between these two is acceptable. In the case of the same basic size, the smaller the dimensional tolerance, the higher the dimensional accuracy.
Orientation tolerance
Orientation tolerance is the total amount of change allowed in the direction of the reference actual element relative to the reference, including parallelism, perpendicularity, and angularity.
Parallelism (∥) is used to control the requirement that the direction of the measured element (plane or straight line) on the part deviates from the reference element (plane or straight line) by 0°, that is, the measured element is required to be equidistant from the reference.
Perpendicularity (⊥) is used to control the requirement that the direction of the measured element (plane or straight line) on the part deviates from the reference element (plane or straight line) by 90°, that is, the measured element is required to be 90° to the reference.
Angularity (∠) is used to control the degree of deviation of the measured element (plane or straight line) from the reference element (plane or straight line) from a given angle (0°~90°) on the part, that is, the measured element is required Make a certain angle to the reference (except 90°).
Location Tolerance
Location tolerance refers to the total amount of changes allowed by the associated elements to the datum position. The zone of the positioning tolerance zone relative to the datum is fixed. The location tolerance zone not only controls the position error of the measured element, but also controls the direction error and shape error of the measured element.
Location tolerance includes three types: concentricity, symmetry, and position.
Concentricity tolerance is used to control the coaxiality error of the measured axis of the shaft part to the reference axis.
The symmetry tolerance is used to control the coplanarity (or collinear) error of the measured element center plane (or axis) to the reference center plane (or axis).
The position tolerance is used to control the position error of the measured element (point, line, surface) to the reference. The position error can be divided into three types: given one direction, given two directions, and any direction, the latter is most used.
Run–out tolerance
It can be divided into circular run-out and full run-out.
Circular run-out: refers to the maximum reading difference measured by the indicator in the specified direction when the actual surface being measured rotates around the reference axis without axial movement.
Full run-out: refers to the rotation of the measured actual surface around the reference axis without axial movement, while the indicator moves parallel or perpendicular to the reference axis. The maximum reading difference measured by the indicator during the whole process.
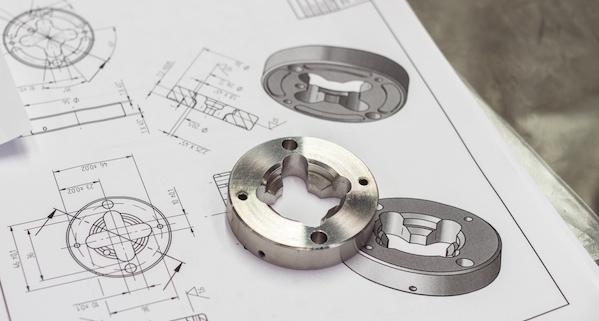
The Importance of Tolerance
Although standard tolerances can be provided for non-tolerance dimensions, many manufacturers do not use them. Many manufacturers can’t start manufacturing parts until the engineer defines all the functions with tolerances. This is because the manufacturer does not have a frame of reference to understand how a part will interact with other parts.
Due to lack of information, manufacturers do not know the importance of specific dimensions to the final design. There is no way to start production.
Depending on whether tolerances are provided, there may be the following possibilities:
Tolerances are provided: After the tolerances are provided, the manufacturer can start part processing immediately after receiving the design and knowing the required size limits. This can minimize costs and shorten turnaround time.
No tolerances are provided and manufacturers refuse to produce: Some manufacturers will not work on parts without providing tolerances to ensure customer satisfaction and reduce re-production costs. Although this can increase turnaround time, it can save engineers’ potential restructuring costs.
No tolerance is provided, and the manufacturer will continue production: In this case, the manufacturer does not understand the lower limit of the design, so a standard tolerance of, for example, ±0.005″ may be applied to the part. This means that the diameter may be 0.005 inches smaller than the specified diameter, or 0.005 inches larger than the specified diameter. If the diameter designed by the mechanic is 0.005 inches smaller than the required diameter, the part will not be able to be installed on the shaft and needs to be re-adjusted or even reproduced. It greatly wastes the time of the designer and the supplier And cost, it may also cause project delays.
Using tolerances correctly means that your parts will fit whether it’s a sliding fit or a press fit. If you’re making parts that are compatible with other components, you absolutely have to define your tolerances. Even a small mismeasurement or variation in size will make your product functionally useless or incompatible.
If you are using unnecessarily tight tolerances, that makes the part more expensive to produce. There is no reason to apply a +/- 0.0002 tolerance when a +/- 0.002 will work well.
Factors That Affect Machining Tolerance
There are many factors to consider when determining tolerances. These include:
Materials:
Materials behave differently under pressure, and some materials are easier to process than others. When determining tolerances, these material properties must be considered.
For example, due to the abrasiveness of the materials, these materials will affect the design tolerances when they wear the cutting machine.
Hardness and stiffness: Generally, the softer a material is, the harder it is to hold a specified tolerance due to the material flexing while cutting. Plastics such as Nylon, HDPE, and PEEK may not hold as tight tolerances as steel or aluminum without special tooling considerations.
Thermal stability: Some non-metallic materials, especially plastics, warp when heated. This limits the acceptable types of machining processes and affects part tolerances.
It is also important to consider which material to use when choosing certain processing processes, because some materials are not compatible with certain processing operations, such as EDM cannot process non-conductive materials.
Processing type:
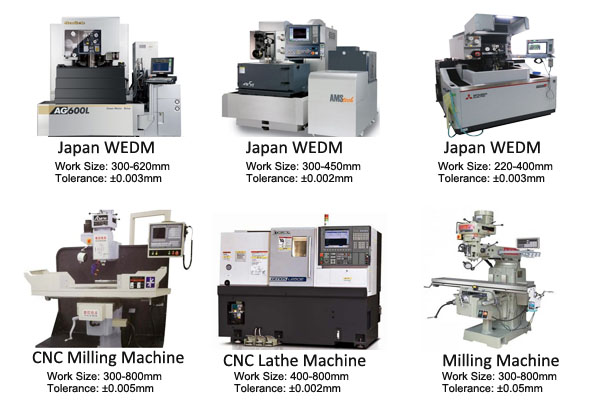
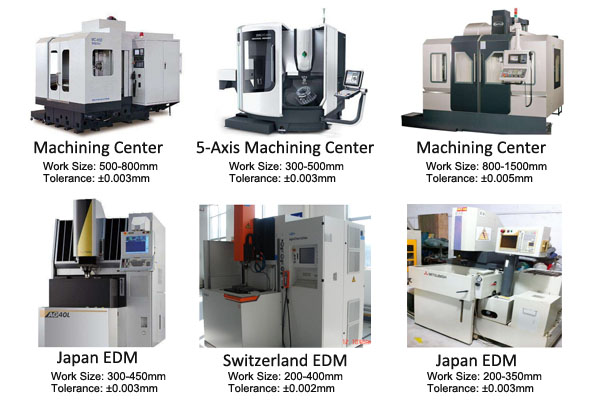
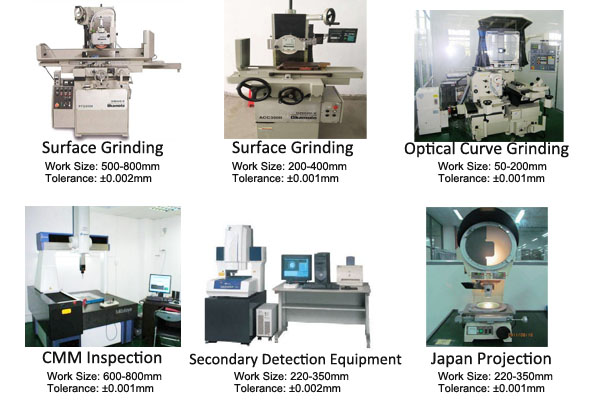
In addition to the materials used, the machine used to produce the part and the type of processing will greatly affect the possible tolerances of the finished part. The right images are some commonly processing machines and their tolerances in SANS Machining.
Plating and finishes:
Any plating or finishing processes should be taken into account when determining part dimensions and tolerances. While plating and finishing add small quantities of material to the surface of a part, these small amounts still alter the dimensions of the final product and should be taken into account before production.
How to Keep Tight Tolerance

1. Find a suitable workplace
When looking for a workshop, you can’t just focus on the community. You also need to consider which floor you want to be on. The first floor (first floor) is the only option. On the second floor, third floor or even higher floors of CNC shops, when the CNC machine is running, you will feel the vibration, and it is almost impossible to manufacture precision CNC parts in the trembling workshop.
2. Use high-quality CNC machine tools
Machine tolerance is one of the most important factors to ensure the quality of parts. If the machine tolerance is +/- 0.02 mm, how to ensure the tolerance is +/- 0.01 mm?
3. Use (correct) sharp cutting tools
The quality and sharpness of cutting tools play an important role in achieving tight tolerances. Blunt tools will not only consume your machine energy, but also make you unable to obtain precision and precision.
4. Experienced engineers:
Experienced engineers know how to modify the design for simple and accurate processing, thereby producing better results. Experienced engineers immediately know which method is the best method for manufacturing parts after having the required CAD files and tolerances.
5. Well-trained operators
Skilled machine operators know how to select cutting tools, program machinery, and perform manual machining and lathe operations. They also know how to recognize the quality of cutting tools and change parameters if necessary. It is also important that a good operator knows how to protect parts during and after processing.
6. Strong quality control department:
Good quality control does not automatically increase tolerances, but it can ensure that parts that exceed acceptable tolerances will not be sent to customers by mistake.
7. Good communication:
Good communication with customers and employees can achieve better results in the store. The production department must accurately understand the customer’s needs and communicate the actual possibilities to the customer, which is very important.
SANS Machining specialize in custom CNC machined part manufacturing for more than 10 years. We base our operations on the strictest quality standards and inspect all parts individually before shipment to ensure that our parts exceed expectations. If you have related projects, you can send drawing to us for detailed quotation.


